A voiceover can pronounce every word correctly and still feel rushed. The listener needs a moment between an introduction and an instruction, or between two parts of an explanation. Adding silence at those boundaries can make the sequence easier to follow without slowing every word.
This guide shows how to add pauses to text to speech in EaseVoice's Solo editor. Use Pause for one specific point and Auto Pause for sentence or paragraph boundaries. These controls depend on the selected voice. Start with a voice for which the controls are available; do not assume every model or custom voice handles pauses in the same way.
Before you start
Open Text to Speech and choose Solo. Have a short script ready, ideally two or three complete sentences. If you need a different voice or language, use the voice library to find a suitable option before tuning the timing.
Keep the original script separately. A clean copy helps you distinguish changes to the wording from changes to pauses. The screenshots below show the real English-language studio and its existing controls; button labels may appear in your selected interface language.
You can prepare the script and inspect the controls before generating audio. When you decide to generate, check the account's displayed allowance and sign in if requested. Generation can use allowance. This guide does not promise free or unlimited synthesis.
1. Mark the point where the listener needs a break
Paste this example, or use a similarly short passage:
Welcome to the product tour. First, open the dashboard.
Next, choose the project you want to review.
This is an illustrative script, not a customer recording. Read it aloud once. The natural place for a deliberate break is after “product tour,” before the first instruction. The paragraph break separates the next task from the opening explanation.
Do not put a pause after every few words. Start with one meaningful transition. If the first sentence is hard to say even when read aloud, shorten it before adding controls. Silence cannot repair a sentence that contains too many separate ideas.
2. Insert a manual pause with Pause
- Place the text cursor after the first sentence, where you want the break.
- Select Pause beneath the editor. The editor inserts a pause marker and opens its duration menu.
- Choose one of the displayed presets: 0.25s, 0.5s, 1s, or 1.5s. For this example, try 0.5s as a starting point.
- For another duration, enter seconds in the menu and select Apply. The current editor accepts manual pauses from 0.1 to 5 seconds.
- Select the marker again if you want to revise that pause. Check that the marker sits between the intended sentences, rather than inside a word.
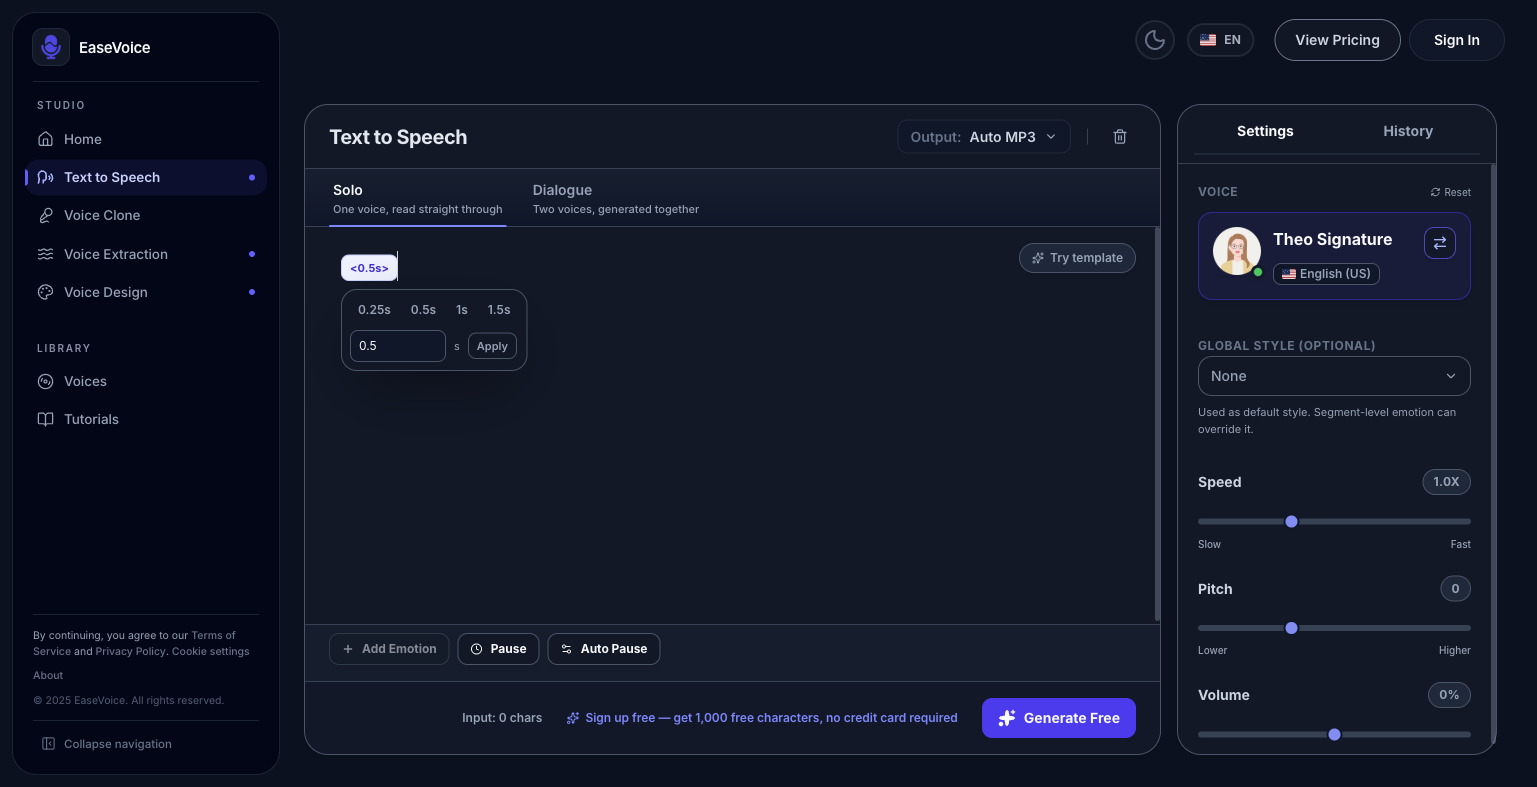
The half-second setting is an editing suggestion, not a universal rule or a guarantee of the final recording's measured duration. The voice can also introduce its own natural phrasing. Use the editor control instead of pasting an arbitrary SSML tag or typing a marker that merely looks similar.
3. Set sentence and paragraph pauses with Auto Pause
Use automatic pauses when the same boundary occurs throughout a passage. This avoids inserting a marker after each sentence individually.
- Open Auto Pause beneath the editor.
- Set Sentence Auto Pause. The displayed options are 0s, 0.5s, 1s, and 2s.
- Set Paragraph Auto Pause separately using the same options.
- Select Confirm Settings.
For the sample script, a useful first comparison is sentence pauses at 0.5s and paragraph pauses at 1s. These are starting values to test, not recommended settings for every voice or language. Choose 0s for a boundary type if you do not want an automatic pause there.
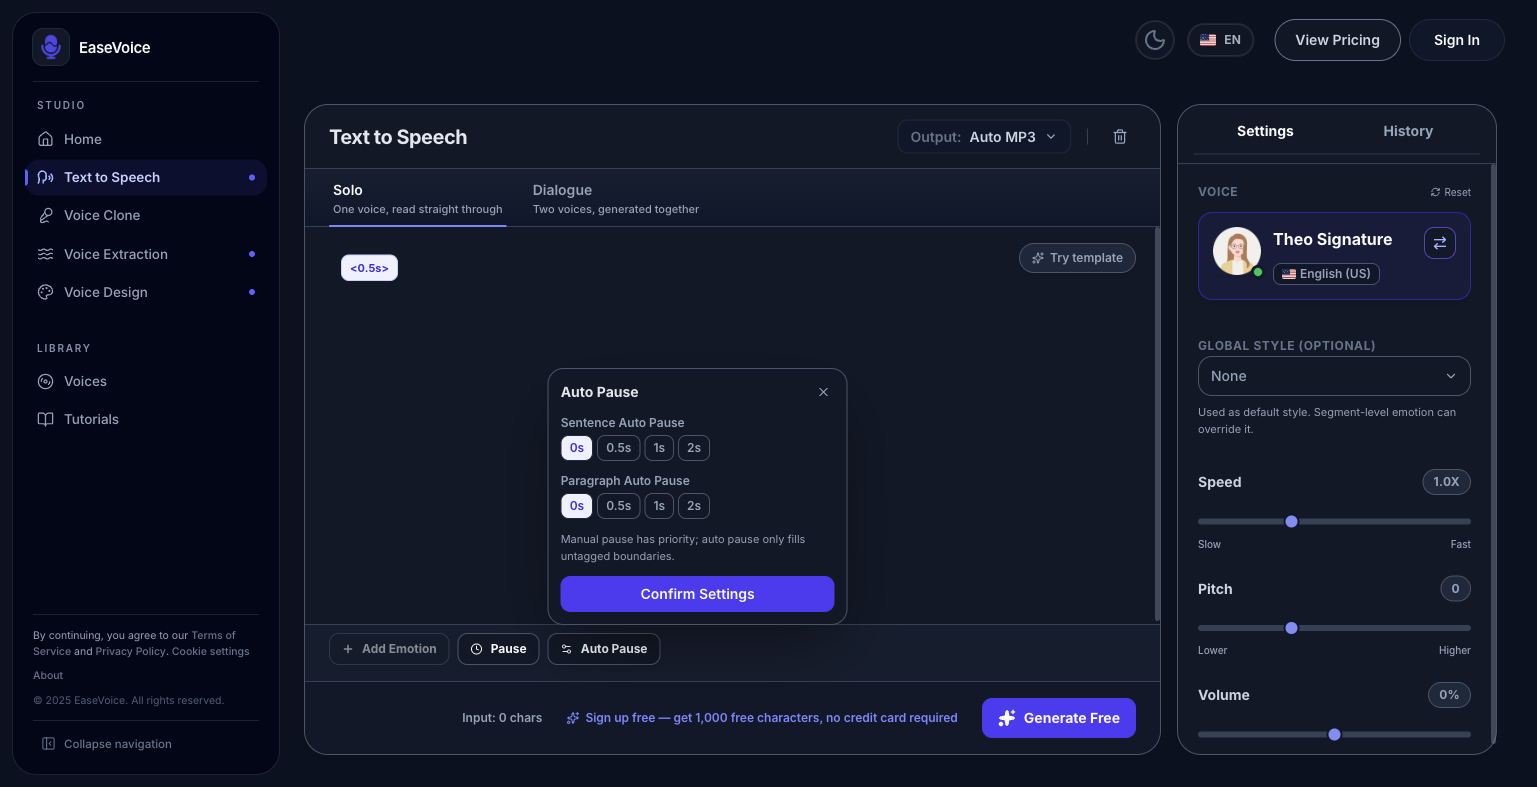
The panel states that manual pauses take priority: automatic pauses fill boundaries without a manual marker. Do not add the two selected durations together to predict the result at a manually marked boundary. Keep sentences punctuated clearly and use a real paragraph break where the subject changes.
4. Review a short generation before the full script
When you are ready to use your allowance, generate only the sample passage first. Listen to the opening sentence, the transition into the instruction, and the paragraph change. Ask whether the listener has enough time to understand the action without losing the connection between sentences.
Change one thing at a time. If the introduction feels abrupt, revise its manual pause. If every sentence feels disconnected, reduce the sentence setting. If only the change of topic needs space, keep a longer paragraph pause and leave sentence pauses shorter or off.
Once the short version sounds suitable, apply the same approach to the remaining script. Review the downloaded audio as well. For video narration, import the file into your existing video editor and check scene timing there; these pause controls do not automatically synchronize narration to a video timeline.
If the pause is unavailable or sounds wrong
The Pause button is disabled
Check the selected voice first. The current interface disables manual pause controls for designed voices and voices marked as high risk for pauses. Select another compatible voice rather than assuming the control is broken. Availability is specific to the selected voice; this tutorial does not establish support across every Gemini, cloned, or other provider voice.
A long pause appears in the wrong place
Inspect both the manual markers and the Auto Pause settings. Start by removing or shortening the marker at that point, then review the paragraph breaks. Avoid changing speed, wording, and pauses together: you will have no clear way to tell which change helped.
The spoken words themselves are unclear
Rewrite abbreviations or awkward phrases as you want them read. Pauses address spacing, while pronunciation and voice choice are separate checks. For narration that must fit a scene exactly, finish the timing review in your audio or video editor.
Frequently asked questions
Should I use Pause or Auto Pause?
Use Pause for a particular transition or emphasis point. Use Auto Pause for repeated sentence or paragraph boundaries. Begin with the smaller change and listen before applying it to a longer script.
Do I need to write SSML?
No. This workflow uses the existing editor controls. It does not assume that arbitrary SSML pasted into the editor will be interpreted as speech instructions.
Will these settings work identically in every language?
Do not assume they will. Prepare complete sentences in the target language, choose a compatible voice, and review that language's short sample. A timing choice that fits one script may feel unnatural in another.
Where can I check usage limits?
Check the allowance shown in the studio and the current membership information before generating a longer passage. For the basic creation and download sequence, see Getting Started.